
Hey Jonathan here from Norfolk FX Trader, and In this post, I’m going to be sharing with you the set and forget strategy.
This strategy is pretty simple: you’ll be setting your trades and walking away. The market will take care of the rest! By the end of this post, you’ll know what the set and forget strategy is and how you can apply it in your trading!
Okay, so let’s get into this trading post straight away, and let’s talk about what this set and forget strategy is. Now the Set and Forget Trading Strategy is to be used with the trend so the first thing you need to understand. Is we need to apply it with a trend.
Applying With The Trend
Now… the trend if you haven’t already gone through one of my previous videos on how to determine trends. Using supply and demand, then I’ll leave that video below now so you can watch that video understanding how the trends are formed with a supply and demand concept.
Which will give you a heads up on how to find a trend before you start using this set and forget strategy. But an entry must only be used with the trend, you’re not taking a reversal with a set and forget strategy.
You want the trend to be on your side when taking that trade. I’ll go through in a moment exactly how that would look, so that’s the first point that you need to know before using the set and forget strategy.
Fresh And Tested Supply And Demand Level Zones
The second point you need to look at is when taking a trade with a set and strategy, you need to be coming off a fresh zone of supply or demand.
Using fresh and tested areas of supply demand, with this type of strategy. There’s actually another video that will teach you how to find and draw these zones as well. Once again, I’ll leave this video on how to identify fresh and tested supply and demand level zones below.
I suggest watching this video first, before continuing with the rest of this post. Just remember you need a good understanding of what a fresh area of supply or demand looks like, when taking a trade using this strategy. And you need to make sure you’re going with the overall trend.
Now… there’s much more to it than just that, and number three with what is the next important part to using a set and forget strategy?
Buy And Sell Limit Orders
The next important part to the set and forget strategy, is you will use limit orders when placing your trades.
With using limit orders… now that means buy and sell limit orders. You will also be placing your stop loss ahead of time and your profit targets ahead of time.
So this is a total complete set and forget strategy, where you will be placing your entry using a limit order, placing your stop loss and you’re take profit.
More later in this post exactly how you’ll place those areas.
Risk And Money Management
This brings us to number four.
Number four is going to be the risk and money management aspect, which is important with this strategy.
You need to understand the risk and money management side, if you want to learn more on how you can grow your trading account without blowing your account. Then I suggest watching this pre-recorded FREE webinar now clicking here.
But, in this trading post, I will briefly cover money management.
Recap
Let’s recap now what I will be covering in this post, to help you trade successfully with the use of the set and forget strategy.
So first I’m going to go through trends exactly why it’s important with this strategy. Then I’m going to go through the fresh area of supply and demand also why it’s important with this strategy.
Then we’ll go through the use of limit orders with your stop loss you’re take profit areas and how you’ll be applying those when taking a trade.

Finally I will talk briefly about the risk management and exactly how you’ll use that with this strategy. Now remember as I said in the beginning of this post, you need to have a good understanding of the trends with supply and demand and those fresh areas of supply and demand.
So make sure you watch those videos above, either after reading this post or you watch them first now.
You also need a good understanding how to find, identify and draw those zones. That is going to be something that you can watch, on another video in my supply and demand video series. Which you’ll find there’s a couple of videos that you’ll be able to watch those now as well.
I will leave those videos below in case you want to check those out first…
But the idea… is this is the main section when it comes to taking a set and forget supply and demand strategy. But if you don’t know how to draw those zones and identify them correctly on your charts.
There’s no point even trying to do this because you need to know that first!
Supply And Demand Multiple Time Frames
So just remember this order…
We’re now going to go through the trend section first, sharing the use of trends I’m going to base everything on a demand zone.
But just remember the opposite will be true when you look to use a sell of supply.
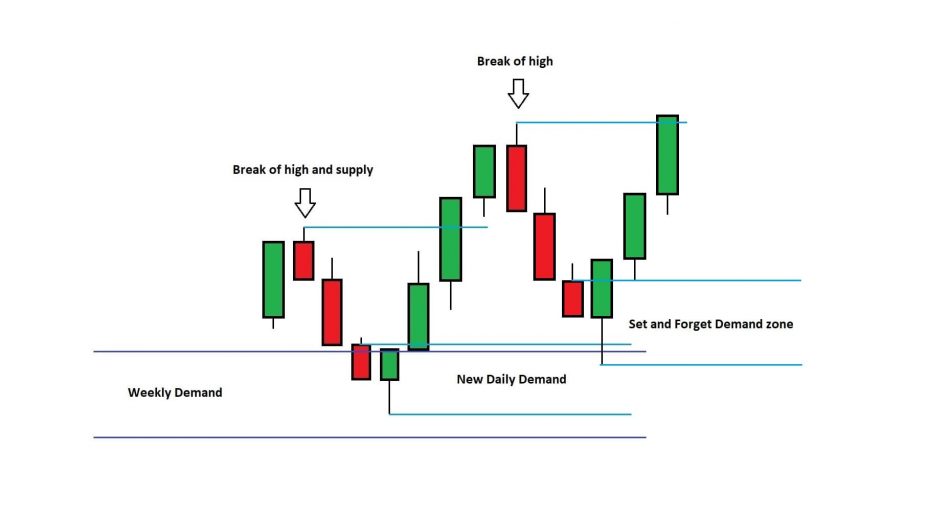
So when you’re looking for a trend you’re looking for the market reversal, and what you’re looking for is when the market comes down into perhaps a large area of a weekly demand.
You’re normally looking for the market to bounce off and reverse of a higher time frame and that comes into those multiple time frames, and what is the best time frame to trade.
Once again, to give you the very best experience of learning with my education, I have created a couple of videos to share these concepts.
To learn more on the use of multiple timeframes with a supply and demand trading concept, and which time frame is the best to use, check them out now below.
What you’re looking for is the reversal to happen out of this area of weekly demand you want to see the market rally up removing a previous high.
Which is also going to be an area of supply, then you’re looking for the bullish move to remove that supply zone that’s going to create a new area of daily demand.
See the diagram below to demonstrate what I have just said above.

Trend Reversal Pattern
Now you’re not actually trending at this stage, you’re just identifying a reversal and what you need to see for a trend reversal.
If you’ve been through that video on determining a trend with supply and demand you need to see new areas of demand being created.
You also need to see them being respected holding price up, and what you need to see next is the market to come back and show you that the bulls have turned up at this demand zone.
It’s here where the bulls have then pushed the market higher breaking the previous high creating a new area of demand.
This is the start of your trend.
This will be the first area you could look to take a set and forget strategy ENTRY from.
See below a diagram of exactly what it is you need to see at this stage.
Now remember this has to be a fresh area of demand to take this trade. That comes into the second step of understanding this reversal, that you need a fresh area once the trend has developed.
I do suggest watching the video above on how to identify fresh and tested supply and demand level zones.
So let me once again explain this diagram above in more detail, what is actually happening.
You need to see the market first dropdown into the weekly area of demand. Previously the market has been in a downwards trend approaching this area of demand on a higher time frame.
That’s when you start to look for signs of reversals, at this point inside the weekly demand. You want to see the market coming out of this higher time frame of weekly demand.
Now you haven’t created any areas of demand yet until the market rallies up removing the previous highs. And a previous area of supply.
Once this supply zone has been removed you create this first area of daily demand.
This is your first area of demand that has been created and where you start to see the reversal of the market. This is not a new trend formed yet.
What you need to see now is the market to drop back down into this newly created area of demand. It’s important here you see buyers turn up, and you need to see this demand hold.
You want to see this demand zone respected and hold the market, with seeing price pushed back higher.
Once you see this, it will create a new area of demand and as long as this area is a fresh zone of demand. Which if you’ve gone through that fresh and tested area of supply and demand video you can see that the diagram above is a fresh zone.
And this is where you will then look for a set and forget supply and demand trading strategy entry with placing your limit order.
Set And Forget Strategy Entry Requirements
Let’s now take a look at how you will be placing this entry.
You’ll place your stop below the area of set and forget demand zone plus a few pips, this would be your stop loss and where you are prepared to lose on the trade.
Your buy limit order, will be placed also ahead of time, at the last bearish candle open price. This is where you want to see price now return to before heading back higher.
This is where patient and discipline is required as a trader, and this is something you will learn much more about in my Forex masterclass course. Which you can learn more on now by clicking here.
Now you’re looking for the market to comeback to your buy limit order, once it does and you’re entered into the buy trade.
I’ll now go through how you look to take profit.
Just remember the exact same opposite would apply to an area of supply and we’d just be looking for a sell limit order instead.
Before I cover your take profit area, lets take a look at this diagram below of how you would setup an entry using the set and forget strategy.
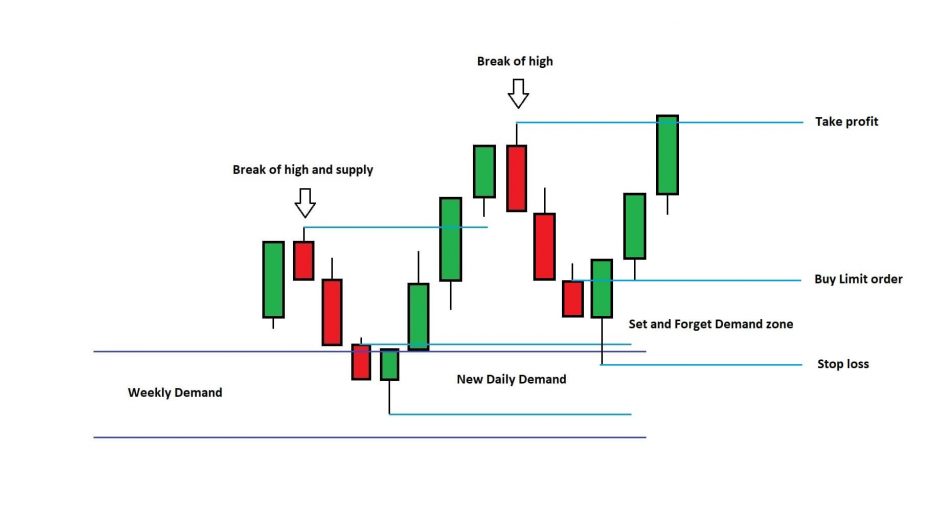
So that is exactly the steps you will look to use with the set and forget strategy, remember you’re looking for the trend, you’re looking for a fresh area of supply or demand. Then you’re going to place your limit order and stop loss.
Then finally you’re going to look to use the correct money management!

So let’s now go into those profit targets.
You’ve placed your buy limit order and the stop loss a few pips below the demand zone.
You have three options now to look to take profit.
- Look for a 3-1 risk to reward profit target (this is using a fixed profit target on each trade).
- Target a previous high or low in the trend direction.
- Target an opposing zone of supply or demand for your profit target.
Now the third way to look for a profit target at an area of opposing supply or demand zone. Would give you the highest risk to reward on a trade, but not always going to give you the profit.
Personally, I would use this type of a profit target when we don’t have space in the market to the left
What do I mean?
If price is moving into new highs in this example, taking a trade of demand. You would then have a better chance of hitting either the previous high or an opposing zone of supply.
It’s a good way to look for highest risk to reward.
In this final diagram it shows taking a trade with the buy limit order targeting the previous highs.
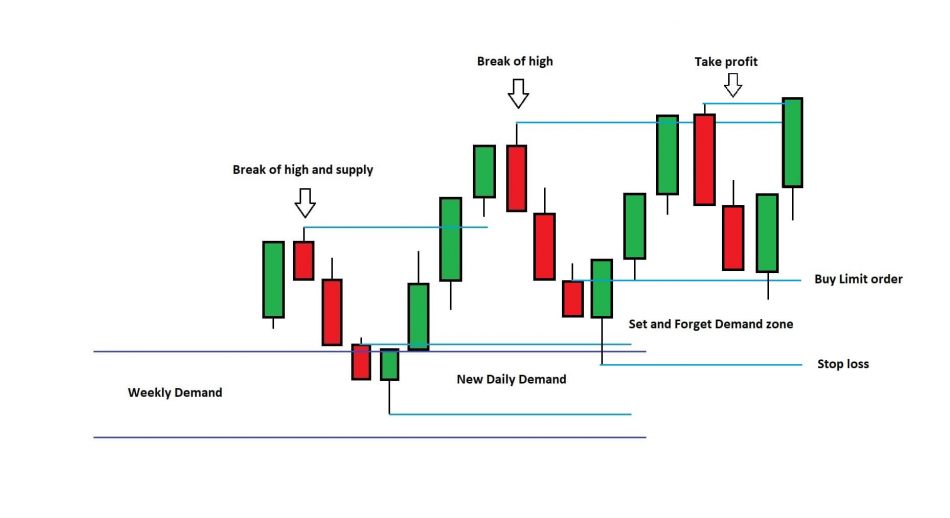
This trade was picture perfect, as price tested the demand zone with triggering the buy limit order. Then returning to hit the take profit target at the previous high.
Money and Risk Management
Now you know how to find your targets, in this final section of this trading post is going to be the most important!
I’ve left it till last to go through the money management, I don’t know what else you’ve learned in your trading but what I suggest is you never risk more than two percent per trade.
Using two percent per trade on your account, or even a one percentage risk per trade if you’re just starting out.
I suggest just one percent per trade but if you’ve been trading for some time, and you have some experience in the market. Then I can say two percent max per trade and never risk more than six percent at anyone time.
What this is going to do is stop you from blowing your account!
The idea is you’re going to be looking for around about a four to six percent profit per trade. Now over time, that is going to gradually increase your account understanding good risk management.
Never go and revenge trade.
What do I mean by revenge trading?
Don’t look to lose a trade and then go and try and trade with a four percent risk, thinking you’ll win it back. Because it won’t work like that and you will lose more and more, and that’s how you eventually blow your trading account.
So the final section to trading a set and forget strategy, is to remember we’re only risking a two percent maximum per trade. And a six percent maximum at any one time.
Which means three trades at once.
Of course I suggest to get your own financial advise when it comes to risk and money management, and never trade with more then you can afford to lose.
Conclusion
I hope this trading post has given you a good insight on how to use the set and forget strategy with supply and demand trading concept.
I suggest you use it on a daily time frame to start with, so you learn how to use a this strategy successfully.
Now I’m not saying it can’t be used on lower time frames, but just start on a daily time frame with the use of multiple time frame analysis.
Remember you have to use the trend and those fresh areas of supply and demand and more importantly don’t forget about this money management.
Now you have a full working supply and demand trading strategy to apply in your trading. I hope you’ve enjoyed this post today. And make sure to watch all the videos I have presented in this post as each and every one will help you massively in your trading.
